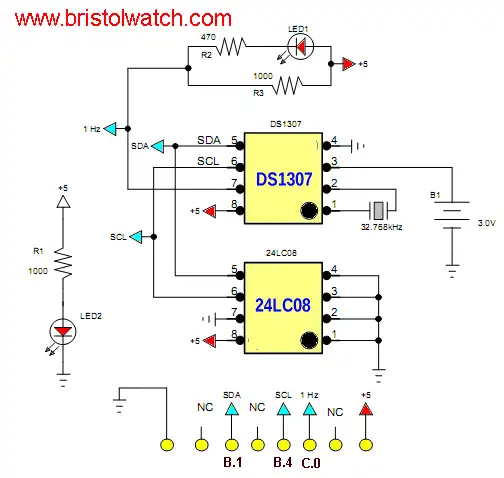
Note the EEPROM can be left out.
DS1307 Real Time Clock Raspberry Pi I2C Interface
Note one can use any pre-made module.
Updated latest Raspbian 2019.
First let's do an update of the system if you haven't already:
~ $ sudo apt-get update && sudo apt-get upgradeSome of these may already be installed:
~ $ sudo apt-get install i2c-tools python-smbus Stop! If running latest Rasbian with i2c enabled the DS1307 works by default.
Setting the RTC Clock
The RTC module must be loaded by the kernel by running:
~ $ sudo modprobe rtc-ds1307Now you need to be running as the super user; type in:
~ $ sudo bashThen, if you have a Rev.2 Raspberry Pi or later:
~ $ echo ds1307 0x68 > /sys/class/i2c-adapter/i2c-1/new_deviceOr if you have the older Rev.1 Raspberry Pi, use:
~ $ echo ds1307 0x68 > /sys/class/i2c-adapter/i2c-0/new_deviceThen:
~ $ sudo geany /boot/config.txtAdd:
# hardware clock

device_tree=bcm2710-rpi-3-b.dtb

dtparam=i2c_arm=on

dtoverlay=12c-rtc,ds1307
Assuming leafpad is your text editor (if not use geany) we need to have the i2c modules loaded by default at boot time so add the following to /etc/modules opened in a text editor:
~ $ sudo leafpad /etc/modules Add if not already there:
i2c-dev

i2c-bcm2708

rtc-ds1307
Save and then exit the editor.
Rebbot Raspberry Pi.
Next you will need to add the DS1307 device creation at boot by editing the /etc/rc.local file by running
~ $ sudo leafpad /etc/rc.localAdd the following lines to the file: before exit:
echo ds1307 0x68 > /sys/class/i2c-adapter/i2c-1/new_device

sudo hwclock -s

date
Then reboot.
In terminal type sudo i2cdetect -y 1 (enter) and you should see:
This if the DS1307 is recognized:
pi@raspberrypi:~ $ sudo i2cdetect -y 1
     0  1  2  3  4  5  6  7  8  9  a  b  c  d  e  f
00:          -- -- -- -- -- -- -- -- -- -- -- -- --
10: -- -- -- -- -- -- -- -- -- -- -- -- -- -- -- --
20: -- -- -- -- -- -- -- -- -- -- -- -- -- -- -- --
30: -- -- -- -- -- -- -- -- -- -- -- -- -- -- -- --
40: -- -- -- -- -- -- -- -- -- -- -- -- -- -- -- --
50: -- -- -- -- -- -- -- -- -- -- -- -- -- -- -- --
60: -- -- -- -- -- -- -- -- UU -- -- -- -- -- -- --
70: -- -- -- -- -- -- -- --
68 is now UU.
Now let's set the time
.pi@raspberrypi:~ $ date
Sun Feb 10 13:50:51 EST 2019
Use your current time and date!
If not correct set the time-date. Change time-date in Linux command line:
~ $ date -s "28 APR 2019 10:42:00"To update the RTC:
~ $ sudo hwclock -wCheck the DS1307 RTC:
~ $ pi@raspberrypi:~ $ sudo hwclock -r To allow a user such as pi to access i2c from userspace if needed:
~ $ sudo adduser $USER i2c Reboot and ready to go.
- Software and setup:
- Raspberry Pi Openbox Desktop 2019
- Setting up Openbox for Raspberry Pi
- WiringPi and Pulse-Width-Modulation with Raspberry Pi
- WiringPi for Raspberry Pi and MAX6675 thermal-couple sensor
- WiringPi Blink an LED Demo
- Interface I2C LCD to Raspberry Pi in C
- ADS1115 4-Channel ADC Uses I2C with Raspberry Pi
- MCP4725 12-Bit DAC Interface to Raspberry Pi
- Raspberry Pi with PCF8591 Analog To Digital Control in C
- Raspberry Pi PCF8591 AD-DA Sensor Python Interface
This is a collection of programs and hardware hacks related to mainly Raspberry Pi and Debian Linux.
- Main Light Fast Linux Desktops with Openbox, JWM
- Test Reuse Surplus PC Power Supplies
- Add WBAR Launch Dock to Raspberry Pi
- Add MPG123 Terminal Music Player to Raspberry Pi, Linux
- Basics of Alsamixer Audio Control for Linux
- Add Solid State Hard Drive to Raspberry Pi
- Beep a PC Speaker Add Beeper to Raspberry Pi
- Using FEH Wallpaper Setter Under Linux
- Scrot Lite Weight Screen Shot Software for Linux
- Using Light Weight Beaver Text Editor
- Install Viewnior Image Viewer for Linux
- Zmixer ALSA Sound Control Tutorial
- Tutorial Xinitrc Desktop Manager Control for Linux
- Setup Raspberry Pi Using JWM Window Manager
Web site Copyright Lewis Loflin, All rights reserved.
If using this material on another site, please provide a link back to my site.