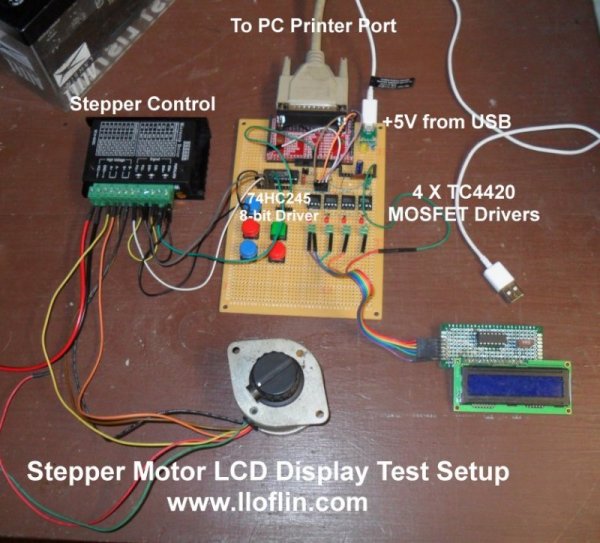
Fig. 1 Home built parallel port breakout board stepper motor demo.
Build or Buy Parallel Port Breakout Board?
There are PC mother boards available at low prices with parallel ports aka printer ports. While obsolete today replaced by USB, they offer much to the hobbyist.
They are easy to program under Linux and Windows 98 on backwards. Here we program real hardware I/O.
In fact they are still used to control CNC (computer-numeric-control) machines.
I'll looking at building or using CNC breakout boards to operate all types of hardware.
This will involve tested hardware examples and programming examples.
The question becomes build or buy a breakout board? That depends on the skill level of the individual.
I built mine as shown in fig. 1. I also bought and tested a commercial unit in fig. 5 below. Each has their drawbacks.
Note at this point these PCI printer port cards from Ebay and Amazon will not work. They require special Windows drivers. Technical information is lacking. I'll be using Linux.
I'll give a brief overview of the port.
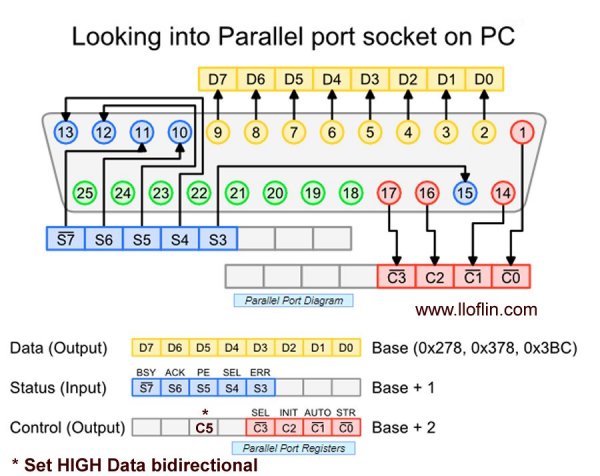
Fig. 2 Parallel port registers, definitions.
Fig. 2 illustrates the 3 I/O addresses and pin connection on a parallel port. Looking into the back of the PC or motherboard note the connections above.
Note some mother boards have a separate header for the parallel port.
Known commonly as DB25 we have 25 connections. This includes 7 inputs, 12 outputs, 8 ground connections. They is no supply voltage.
These are 5-volt TTL logic levels. The outputs should be buffered. This is usually 74HC244, 74HC245 or similar octal buffers.
The base register address is usually 0x378. This is a complete 8-bit TTL I/O register known as DATA.
The next address is 0x379 known as STATUS and is input only.
Only 5 bits are used labeled S3 to S7. S7 is inverted, reading the register the bit will be LOW if the input is HIGH.
All 5 pins are pulled HIGH by internal pull ups to HIGH. External pull up resistors (4.7K) are often used. It is a good idea to us opto-couplers on the inputs.
The final register is CONTROL at address 0x37A. Only 5 bits are implemented with 4 (C0-C3) available at the connector.
Bits C0, C1, and C3 are inverted - a HIGH written to the bit produces a LOW output.
Bit C5 sets the DATA port as either OUTPUT only (default C5 = LOW) or bi-directional (C5 = HIGH).
Programming these registers are covered elsewhere.
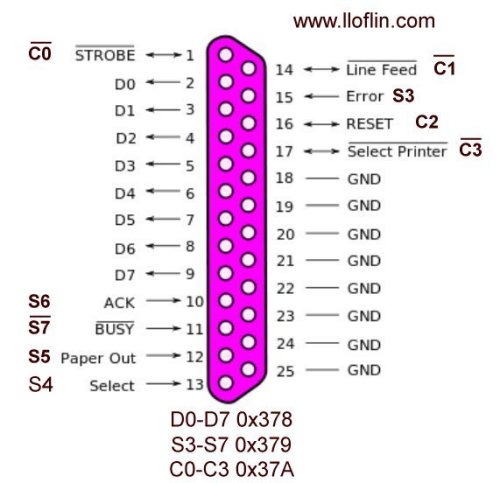
Fig. 3 DB25 parallel port pin connections.
Fig. 3 again illustrates the port connections from a printer viewpoint.
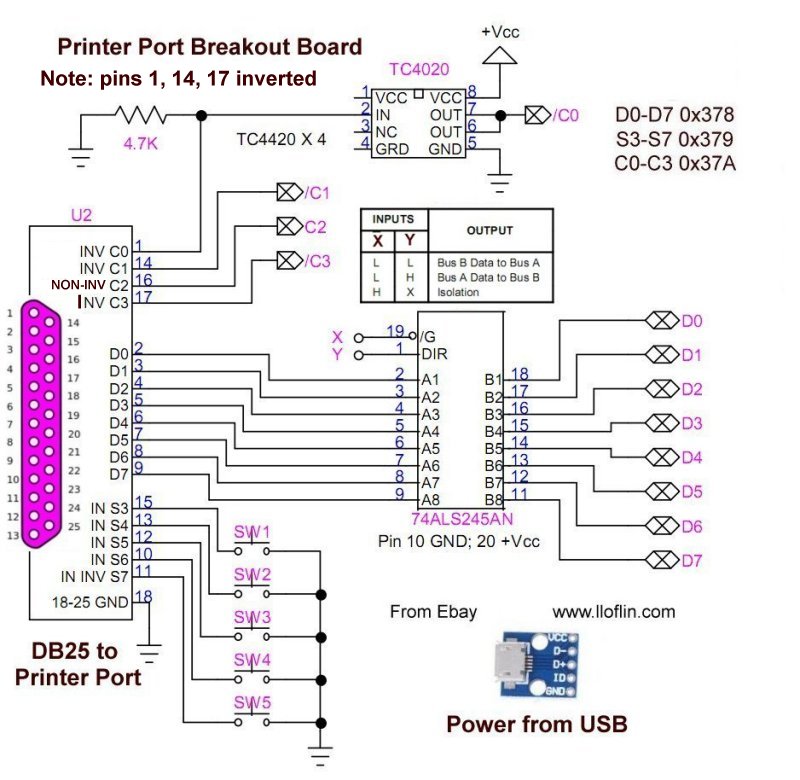
Fig. 4 my home built parallel port breakout board schematic.
Fig. 4 is the schematic to my board used in the most videos and Fig. 1. 5-volt power is derived from a USB port.
A 74HC245 buffers the 8-bit DATA and can supply ~15mA per pin.
One could also use a ULM2003 to small drive stepper motors or relays. (Use separate power supply for motor!)
The 4 CONTROL pins drive TC4420 (or TC4429) MOSFET drivers. Current up to 500mA. (4 are used, one is illustrated.)
The +Vcc can be connected to a separate supply up to 20V or to the +5 volts USB power.
If driving MOSFETs or MOSFET inputs such as the TC4420/TC4429 use 4.7K pull-down resistors on pins 1, 14, 16, 17.
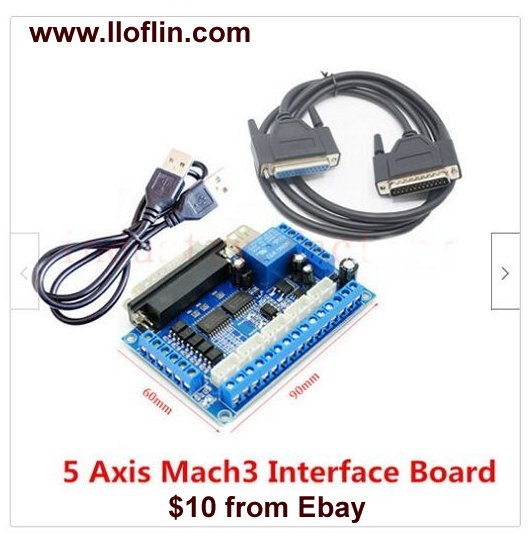
Fig. 5 $10 5-axis Mack3 Interface board from Ebay.
Fig. 5 is a $10 breakout board from Ebay that included the 25-pin DB25 cable and USB cable for 5-volt power.
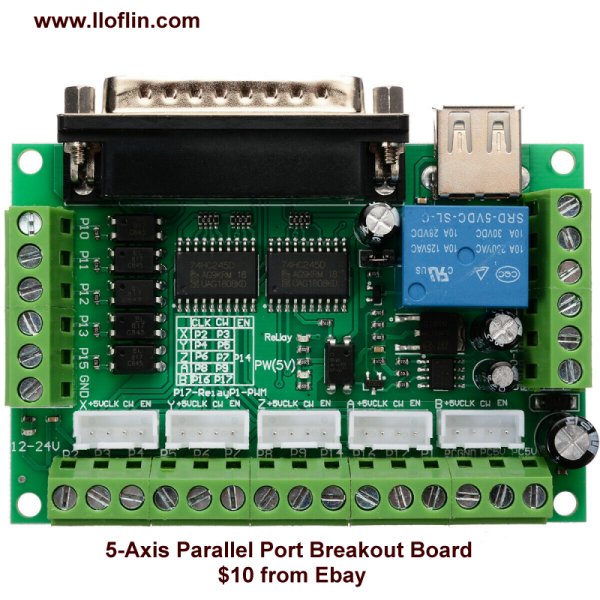
Fig. 6 $10 5-axis Mack3 Interface board from Ebay top view.
Look closely at the screw terminals and most of the pins (P1-P17) are labeled. Note the 5 opto-couplers by the P10, P11, P12, P13, P15 connections.
A switch from any of the inputs to ground takes the STATUS bit (S3-S7) LOW.
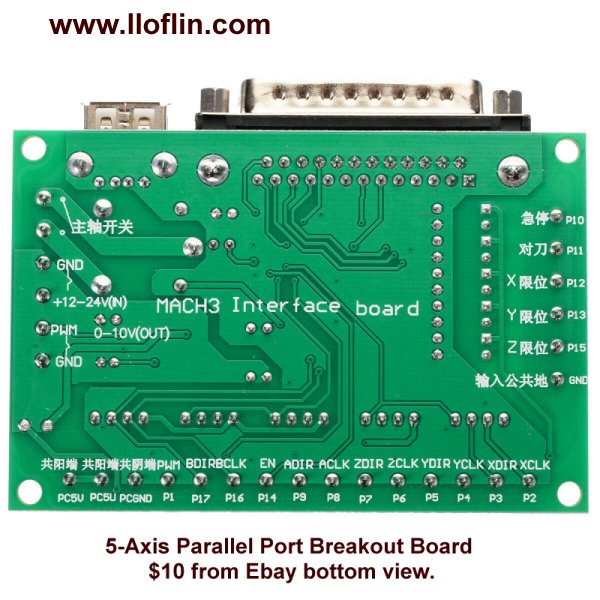
Fig. 7 $10 5-axis Mack3 Interface board from Ebay bottom view.
Fig. 7 is the bottom view showing DB25 pin connections.
If one builds their own board we have far greater flexibility with the design. But it requires soldering skills and a lot of work.
Buying a breakout is cheap and operational out of the box.
View all of my You Tube Videos
Also visit and subscribe to My YouTube Channel
- Hobby Electronics Home Page
- Donate
- Exploring Digital Computer Electronics
- Hardware
- Hardware Review Connecting PC Parallel Ports
- Operation TB6600 Stepper Controller with PC Parallel Port
- Build or Buy Parallel Port Breakout Board?
- Build Serial HD44780 LCD Display Connect to Parallel Port
- Motherboards
- Presario 1999 CM1001 Gaming Computer Salvage
- Live Test 2002 VIA EPIA-800 Mini ITX Motherboard
- Salvage, Test 2012 AAEON EMB-B75A Industrial Motherboard
- Main Light Fast Linux Desktops with Openbox, JWM
- Test Reuse Surplus PC Power Supplies
- Add WBAR Launch Dock to Raspberry Pi
- Add MPG123 Terminal Music Player to Raspberry Pi, Linux
- Basics of Alsamixer Audio Control for Linux
- Add Solid State Hard Drive to Raspberry Pi
- Beep a PC Speaker Add Beeper to Raspberry Pi
- Using FEH Wallpaper Setter Under Linux
- Scrot Lite Weight Screen Shot Software for Linux
- Using Light Weight Beaver Text Editor
- Install Viewnior Image Viewer for Linux
- Zmixer ALSA Sound Control Tutorial
- Tutorial Xinitrc Desktop Manager Control for Linux
- Setup Raspberry Pi Using JWM Window Manager
- Off Site:
- Web Master
- Tri-Cities VA-TN
- General Science
- Hobby Electronics
- US Constitution
- Christianity 101
- Religious Themes
Web site Copyright Lewis Loflin, All rights reserved.
If using this material on another site, please provide a link back to my site.