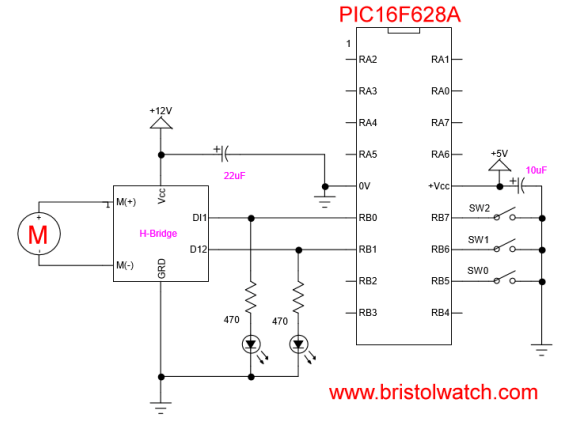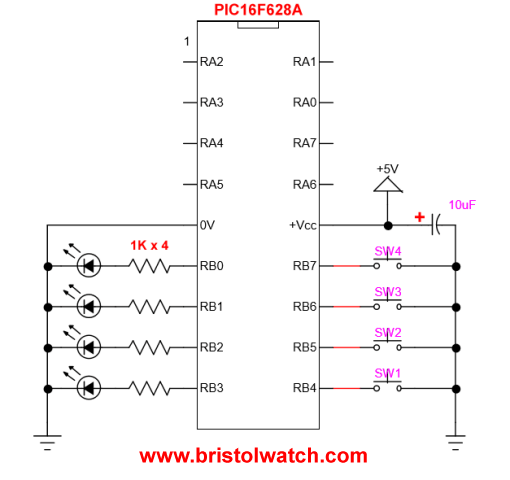
PIC16F628A H-Bridge motor control.
Microchip PIC16F628A H-Bridge Motor Control
Our goal here is the further help the student to understand the relationship between low-level programming and how this related directly to connected hardware.
To better understand this page see Microchip PIC16F84A H-Bridge Motor Control for basic programming explanation. The PIC16F628A does everything the PIC16F84A does plus lots more. I only cover here where they differ. Also see H-Bridge Motor Control Diagram for the generic H-bridge presented above.
- Microchip PIC related:
- How to Use K150 PIC Programmer
- Microchip PIC16F628A Basic H-Bridge Motor Control
- Microchip PIC16F628A Counts BCD on 8 LEDs
- PIC16F84A Operates H-Bridge Motor Control
- PIC16F84A Operates MOSFET H-Bridge
- Using Velleman K8048 PIC Development Board
The complete ASM file is F628A_hb.asm and was complied on MPLAB 8.88. Both of these devices have the same 35 instructions most operating in a single 1uS clock cycle, except branches, which are 2uS at 4mHz. (The 4mHz is divided by 4 internally for a 1uS clock cycle.)
The first difference between the PIC16F84A and the PIC16F628A is the PIC16F84A has only 13 I/O pins with RA5 being reset (MCLR_NOT) and RA6/RA7 lost to connections to an external crystal. The PIC16F628A has an internal 4mHz clock-oscillator and internal reset or can be programmed like the PIC16F84A. This gives us a full 16 I/O pins with the limitation RA5 is input only. In addition the PIC16F628A has double the flash ram (2048 vs. 1024), 2 internal comparators, additional 8/16 bit timers (3 total), and a PWM module on PB3.
To function the PIC16F628A requires only 2-5V and a ground. Three switches (SW0,SW1,SW2) are wired directly to PB5, PB6, and PB7 respectively to ground. Using the PORTB programmable internal pullups eliminates the need for external pullup resistors. When the switch is open the corresponding pin reads HIGH (1 or set); when the switch is closed the corresponding pin reads LOW (clear or 0). Remember these connections show up as bits in the corresponding 8-bit registers PORTA and PORTB.
Note: the reason I use PB4-PB7 as inputs is the ability to make use of the "interrupt on change" later on. This is built into the hardware and can be activated by setting various bits in the interrupt control register. More on that on another page.
Also related to this: Understanding Microcontroller IO Ports
Once again the lingo I use here: HIGH, "1", and SET are the same thing being electrical +5V. LOW, "0", and CLEAR is 0V switched to ground. Unprogrammed I/O pins are often "floating" being neither HIGH nor LOW. Here I've programmed PB0-PB3 as OUTPUTs and PB4-PB7 as inputs with internal pullups turned on. Again refer to Microchip PIC16F84A H-Bridge Motor Control for more on setting up the registers. The main loop is as follows:
LOOP ;Loop starts here !!!
	BTFSS	PORTB, SW1	; is SW1 HIGH ?
	GOTO $+2 ; no skip next line
	GOTO $+3 ; yes skip next 2 lines
	CALL OFF
	BSF PORTB, LD0 ; PBO HIGH

	BTFSS	PORTB, SW2	; is SW2 HIGH ?
	GOTO $+2 ; no skip next line
	GOTO $+3 ; yes skip next two lines
	CALL OFF
	BSF PORTB, LD1 ; PB1 HIGH


	BTFSS	PORTB, SW3 ; is SW3 HIGH ?
	CALL OFF ; no execute this line

	GOTO  LOOP
The above is identical to loop in PIC16F84A H-Bridge Motor Control routine except all switches are HIGH when open and LOW when pressed.
OFF
	MOVLW 0xF0 ; move 0x0F to W
	ANDWF PORTB, F ; AND PORTB with W save result in PORTB
	CALL DELAY_500mS ; wait 500mS
	RETURN
The subroutine "OFF" uses a bitwise AND to clear bits PB0-PB3 turning off the H-Bridge motor control or other connected devices. It then delays 500mS waiting for the motor to stop and for one to get their finger off the push button. When we call a subroutine the address pointer or program counter (PC) is saved on the STACK a temporary memory slot to be recalled later saving the location where the subroutine was called. When a RETURN is executed by the subroutine the PC is retrieved from the STACK with the program going back to the original location. The program continues from there.
Related: Introduction PIC12F683 Programming Circuits Tutorial
See How I got into Electronics
- Arduino Port Registers Revisited
- Digispark ATtiny85 with MCP23016 GPIO Expander
- Safely Build Program a H-Bridge
- Build H-Bridge Motor Control Without Fireworks
- MOSFET H-Bridge for Arduino 2
- PICAXE Projects
- YouTube videos:
- Simple Power Distribution for Prototype Board
- Program Arduino Ports for Speed and Control
- Digispark ATtiny85 with GPIO Expansion
- Safely Program H-Bridge Motor Controller
- Build H-Bridge Motor Control without Fireworks
- MOSFET H-Bridge for Arduino 2
- Arduino Projects Revisited Revised
- Programming ADS1115 4-Channel I2C ADC with Arduino
- Arduino uses ADS1115 with TMP37 to Measure Temperature
- Connect Arduino to I2C Liquid Crystal Display
- Arduino Reads Temperature Sensor Displays Temperature on LCD Display
- Arduino with MCP4725 12-bit Digital-to-Analog Converter Demo
- Videos
- Arduino with ADS1115 4-Channel 16-bit Analog-to-Digital Converter
- Arduino with MCP4725 12-Bit DAC
- Constant Current Circuits with the LM334
- LM317 Constant Current Source Circuits
- Introduction Hall Effect Switches, Sensors, and Circuits

- Microchip PIC related videos:
- How to Use K150 PIC Programmer
- Microchip PIC16F628A Basic H-Bridge Motor Control
- Microchip PIC16F628A Counts BCD on 8 LEDs
- PIC16F84A Operates H-Bridge Motor Control
- PIC16F84A Operates MOSFET H-Bridge
- Using Velleman K8048 PIC Development Board
- Microchip PIC16F84A H-Bridge Motor Control
- Microchip PIC16F628A Basic H-Bridge Motor Control
- PICAXE Operates H-Bridge Motor Controller
- PICAXE Micorcontroller Controls Motor Speed - Direction
- PICAXE Projects
- Arduino Port Registers Revisited
- Digispark ATtiny85 with MCP23016 GPIO Expander
- Safely Build Program a H-Bridge
- Build H-Bridge Motor Control Without Fireworks
- MOSFET H-Bridge for Arduino 2
- Web Master
- Gen. Electronics
- YouTube Channel
- Arduino Projects
- Raspberry Pi & Linux
- PIC18F2550 in C
- PIC16F628A Assembly
- PICAXE Projects
Web site Copyright Lewis Loflin, All rights reserved.
If using this material on another site, please provide a link back to my site.