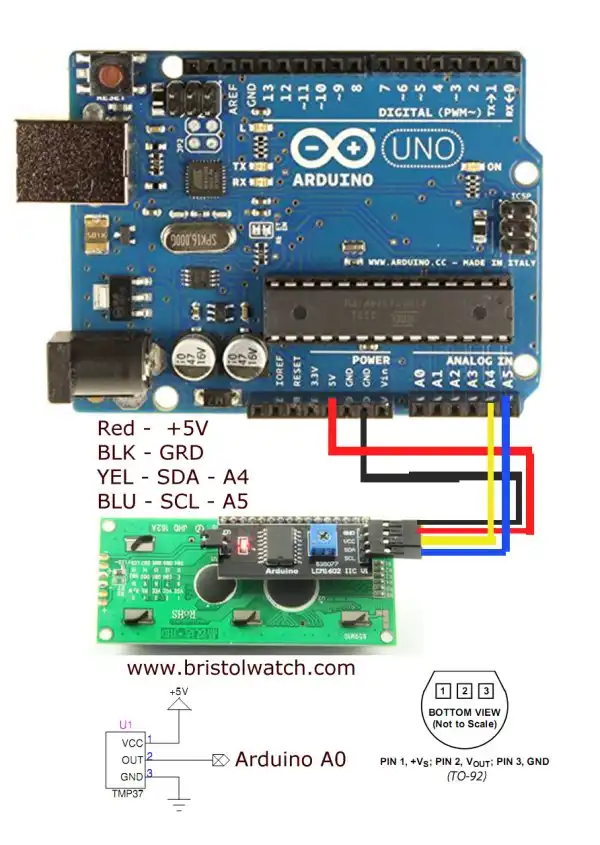
TMP37 pin connections.
Arduino TMP37 Analog Temperature Sensor
by Lewis Loflin
Mfr. Part # TMP37FT9Z
Mouser Part # 584-TMP37FT9Z
Cost June 2022: ~$2 QTY. 1
Note this page uses an I2C LCD display. To use a directly connected HD44780 display see:
Arduino TMP37 Temperature Sensor Tutorial
For better accuracy consider Arduino ADS1115 with TMP37 to Measure Temperature
The ADS1115 is an I2C device that delivers 12-bit accuracy.
Here we will learn how to connect a basic Arduino module to a HD44780 based liquid crystal display and use this to display in Fahrenheit the output of an Analog Devices TMP37 temperature sensor.
Download Arduino code tmp37a.txt. Copy-paste to Arduino compiler.
In this project pin 1 is connected to +5 volts, pin 2 to the analog 0 input on the Arduino module, and pin 3 to ground.
About the Program
An analog to digital converter (ADC) in the ATMEGA168 or ATMEGA328 are 10-bit (1024 steps) and over a range of 5 volts is 5.0/1024 = 4.882 mV per step. The TMP37 produces an output of 20 mV / degrees C.
It's easy to see they don't divide equally. Using the original sample program that came with the part when I ordered worked, but was unstable to the extreme bouncing around as much as ten degrees.
So beside rewriting the code to work with a LCD display instead of a computer serial port, I had to deal with the fact we were using very small real numbers and the fact the hardware didn't exactly match. But accuracy came out within a few degrees with a good 5-volt supply.
This produced both a stable reading within 1.5 degrees of a laboratory analog thermometer. (I don't have digital version.)
YouTube video for this project: Arduino TMP37 Temperature Display
Also see Arduino TMP37 Centigrade Temperature Sensor Tutorial
- Easy Driver Micro-Stepper Controller to Arduino
- Unipolar Stepper Motor with a Arduino
- Considerations for Using Stepper Motors
- Connecting the Arduino to a L298N H-Bridge
- L298N Motor Controller Theory and Projects
- TA8050 H-Bridge Motor Controller
- Quick navigation of this website:
- Basic Electronics Learning and Projects
- Basic Solid State Component Projects
- Arduino Microcontroller Projects
- Raspberry Pi Electronics, Programming
Stepper Motors
- Easy Driver Micro-Stepper Controller to Arduino
- Unipolar Stepper Motor with a Arduino
- Considerations for Using Stepper Motors
- Connecting the Arduino to a L298N H-Bridge
- L298N Motor Controller Theory and Projects
- TA8050 H-Bridge Motor Controller
- Battery Charger related:
- Solar Panel Charge Controller Using Arduino
- Solar Panel Battery Charge Controller Using Arduino
- Solar Panel Battery Charge Controller Switching Circuit
- Arduino AC Power Control Tutorial
- Rotary Encoder Using Arduino Hardware Interrupts
- Arduino Controlling 74C164 Shift Register
- Arduino Interface MC3479 Stepper Motor Controller
Serial LCD Display and assorted Sensors
- Arduino LCD Display using 74164 Shift Register
- Arduino LCD Display with DS18B20
- Arduino LCD Display with DHT11 Sensor
- Arduino with MM5451 LED Display Driver
- Arduino MAX7219 Operates 8X8 LED Matrix
- Arduino RTC Clock MAX7219 LED Display
- BCD Conversion with MAX7219
- Hatching Chicken Eggs with Arduino
- Arduino TMP37 Temperature Sensor
- Arduino TMP37 Temperature Sensor Tutorial
- Testing the Keyes IR Sensor Module with Arduino
- Arduino to MCP23016, LCD Display
- Time-Date with Arduino, LCD Display, DS1307 RTC
- Controlling Driveway Lights with the Arduino
- TSL230R Light to Frequency Converter
- Arduino with MCP23016 I/O Expander
- Arduino DS1307 Real Time Clock
- Arduino with 24LC08 Serial EEPROM
- MC3479 Stepper Motor Controller with Arduino
Web site Copyright Lewis Loflin, All rights reserved.
If using this material on another site, please provide a link back to my site.