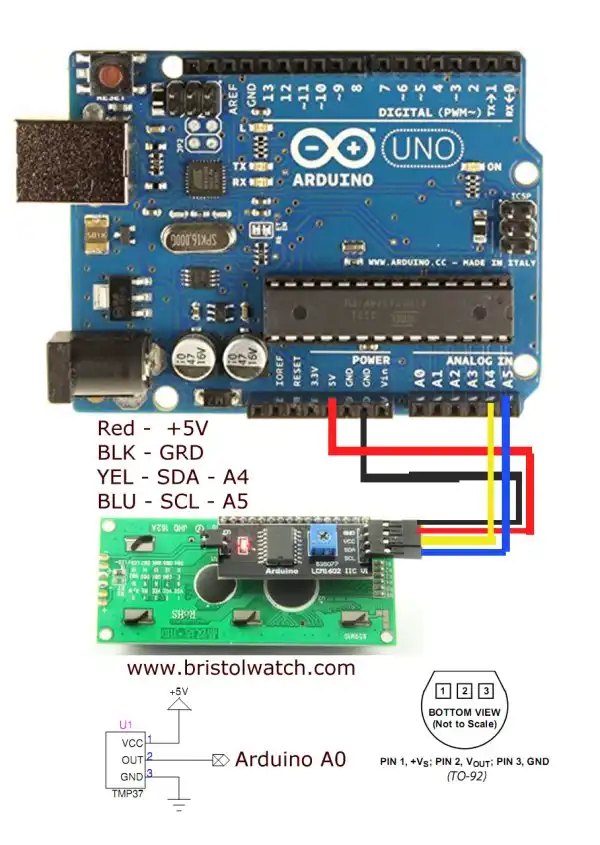
TMP37 pin connections.
Arduino TMP37 Centigrade Temperature Sensor Tutorial
by Lewis Loflin
The LCD display used here is NOT an I2C display. This is a direct connection to Arduino.
To use an I2C LCD display see Arduino TMP37 Temperature Sensor I2C Display
Mfr. Part # TMP37FT9Z
Mouser Part # 584-TMP37FT9Z
Cost June 2022: ~$2 QTY. 1
TMP37 is super simple to use with only three connections. It is also fairly accurate despite the 10-bit limitation of the Arduino ADC pin.
Arduino LCD Schematic Typical 2 line by 16 character LCD connection to a generic Arduino module. R1 is used to adjust LCD contrast, pins 15 and 16 are the back light.
In addition a pre-written programming library is available to operate the display to simplify programming.
Here we will learn how to connect a basic Arduino module to a HD44780 based liquid crystal display and use this to display in Fahrenheit the output of an Analog Devices TMP37 temperature sensor.
For better accuracy consider Arduino ADS1115 with TMP37 to Measure Temperature
The ADS1115 is an I2C device that delivers 12-bit accuracy.
TMP37 Specifications and Pin Connections
The TMP37 is intended for applications over the range of 5 degrees C to 100 degrees C and provides an output scale factor of 20 mV per degrees C. The TMP37 provides a 500 mV output at 25 degrees C. Operation extends to 150 degrees C with reduced accuracy for all devices when operating from a 5 V supply.
The low output impedance of the TMP35/TMP36/TMP37 and its linear output and precise calibration simplify interfacing to temperature control circuitry and ADCs. All three devices are intended for single-supply operation from 2.7 V to 5.5 V maximum.
In my test a stable +5 volt supply must be used!
The supply current runs well below 50 uA, providing very low self-heating-less than 0.1 degrees C in still air. In addition, a shutdown function is provided to cut the supply current to less than 0.5 uA.
In this project pin 1 is connected to +5 volts, pin 2 to the analog 0 input on the Arduino module, and pin 3 to ground.
About the Program
An analog to digital converter (ADC) in the ATMEGA168 or ATMEGA328 are 10-bit (1024 steps) and over a range of 5 volts is 5.0/1024 = 4.882 mV per step. The TMP37 produces an output of 20 mV / degrees C. It's easy to see they don't divide equally. Using the original sample program that came with the part when I ordered worked, but was unstable to the extreme bouncing around as much as ten degrees.
So beside rewriting the code to work with a LCD display instead of a computer serial port, I had to deal with the fact we were using very small real numbers and the fact the hardware didn't exactly match. But accuracy came out within a few degrees with a good 5-volt supply.
This produced both a stable reading within 1.5 degrees of a laboratory analog thermometer. (I don't have digital version.)
Download Arduino code tmp37a.txt. Copy-paste to Arduino compiler.
YouTube video for this project: Arduino TMP37 Centigrade Temperature Sensor Tutorial
- Quick navigation of this website:
- Basic Electronics Learning and Projects
- Basic Solid State Component Projects
- Arduino Microcontroller Projects
- Raspberry Pi Electronics, Programming
Stepper Motors
- Easy Driver Micro-Stepper Controller to Arduino
- Unipolar Stepper Motor with a Arduino
- Considerations for Using Stepper Motors
- Connecting the Arduino to a L298N H-Bridge
- L298N Motor Controller Theory and Projects
- TA8050 H-Bridge Motor Controller
- Battery Charger related:
- Solar Panel Charge Controller Using Arduino
- Solar Panel Battery Charge Controller Using Arduino
- Solar Panel Battery Charge Controller Switching Circuit
- Arduino AC Power Control Tutorial
- Rotary Encoder Using Arduino Hardware Interrupts
- Arduino Controlling 74C164 Shift Register
- Arduino Interface MC3479 Stepper Motor Controller
Serial LCD Display and assorted Sensors
- Arduino LCD Display using 74164 Shift Register
- Arduino LCD Display with DS18B20
- Arduino LCD Display with DHT11 Sensor
- Arduino with MM5451 LED Display Driver
- Arduino MAX7219 Operates 8X8 LED Matrix
- Arduino RTC Clock MAX7219 LED Display
- BCD Conversion with MAX7219
- Hatching Chicken Eggs with Arduino
- Arduino TMP37 Temperature Sensor
- Arduino TMP37 Temperature Sensor Tutorial
- Testing the Keyes IR Sensor Module with Arduino
- Arduino to MCP23016, LCD Display
- Time-Date with Arduino, LCD Display, DS1307 RTC
- Controlling Driveway Lights with the Arduino
- TSL230R Light to Frequency Converter
- Arduino with MCP23016 I/O Expander
- Arduino DS1307 Real Time Clock
- Arduino with 24LC08 Serial EEPROM
- MC3479 Stepper Motor Controller with Arduino
Web site Copyright Lewis Loflin, All rights reserved.
If using this material on another site, please provide a link back to my site.